Free Book Templates for Microsoft Word

What is included
- Different Trim Sizes to choose from
- 2 Separate Styles to choose from:
- Fiction & Nonfiction
- Front Matter:
- Title Page & Copyright Page
- Table of Contents
- Back Matter:
- About the Author
- Acknowledgements
- Margins & Gutters already set
- Properly displayed Page Numbers
- Drop Cap in Fiction Templates

We’ve created this FREE Book Formatting Templates tool so you can quickly and easily format your book with these Microsoft Word templates – without having to make the mistakes so many new authors are often making.
INSTRUCTIONS – How to Use the Formatting Templates
STEP 1:
Select the trim size you wish to use for your book.

STEP 2:
Choose between a fiction or nonfiction formatting template.

STEP 3:
Enter the email you would like us to send your template to and click the Send My Template, Please button.
It should only take a few minutes to receive your template. If it takes longer, please make sure to also check your spam and promotional folders, just in case.
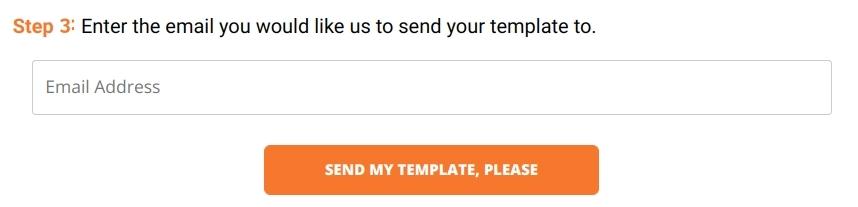
NOTE: Because of the way this tool is set up, we can send each template only once for each trim size, so be sure to make an extra copy of it and save it in a safe spot so you can use it for your current as well as your future books.
How to Convert These DOCX Files to EPUB and PDF
Before you upload your book to Amazon KDP or another Ebook/Print retailer, there are a few things that you should do first, including converting your book to an ebook or PDF (for print).
Converting a DOCX to EPUB
The best way to convert a DOCX file to EPUB is to use a program like Calibre to make the conversion. Calibre is completely safe, and makes the conversion process simple.
What's more, it's also a great way to test your EPUB file for errors (because they can sometimes come up in the conversion).
Converting a DOCX to PDF
Converting your DOCX file to a PDF is actually a lot easier. In Word Docs, if you click on File, there will be a menu item on the left that says Save as Adobe PDF.
All you have to do is click on that button and you'll be able to save your file as a PDF. Then, all you have to do is check the PDF to make sure there are no errors.
Formatting Tips When Using These Formatting Templates
Each FREE template was created in Microsoft Word, so Microsoft Word is required to properly use the templates for the formatting of your book.
We’ve created formatting templates for 5 of the most common trim sizes:
- 5 x 8
- 5.25 x 8
- 5.5 x 8.5
- 6 x 9
- 5.06 x 7.81
And since the formatting is slightly different for fiction and nonfiction books, we went ahead and also created a version for each.
Here are some tips on how to best use your new formatting template:
- TRIM SIZE: Your trim size has already been set for you. To change your trim size, go to PAGE LAYOUT, click on SIZE, select CUSTOM SIZE, and change it to your desired trim size. Be sure to apply your changes to the entire document by selecting WHOLE DOCUMENT from the dropdown menu. Then click OK.
- MARGINS & GUTTER: Your margins & gutter have already been set for you. To change any of these features, simply go to PAGE LAYOUT, click on MARGINS, and make your desired changes. Be sure to apply your changes to the entire document by selecting WHOLE DOCUMENT from the dropdown menu. Then click OK.
- AUTHOR NAME: The author name will appear on the top of every right page, beginning in the actual body of your book, except on chapter pages. To insert your own name, right-click AUTHOR NAME, and then click Edit Header. Now type your own name in the AUTHOR NAME area.
- BOOK TITLE: The book title will appear on the top of every left page, beginning in the actual body of your book, except on chapter pages. To insert your own book title, right-click BOOK TITLE, and then click Edit Header. Now type your own book title in the BOOK TITLE area.
- TABLE OF CONTENTS: To update your Table of Contents once you have completed pasting in your book, simply right-click the table, select UPDATE FIELD and click on UPDATE PAGE NUMBERS ONLY. Then click OK.
- DROP CAPS: To make any adjustments to your drop caps, it’s best to wait until you’ve completed formatting the rest of your book. To move it, simply click on each drop cap, and drag it into the desired place. To resize it, click on it, select it, and change it to your desired font size.
Would You Like Something Easier?
We've done our best to try and make these templates easy to use. However, using Word to format books is complicated at best, and there are easier ways to format your book overall.
One of these ways is to use Atticus, a book formatting software that eliminates the headache from formatting Word documents. For example, it does the following far better than Word:
- Adjusts for trim size and margins at the click of a button
- Has a much wider variety of trim sizes
- It automatically generates a Table of Contents
- It lets you customize and create beautiful chapter themes
- It's cheaper than the leading alternative
- It's available on all platforms, including Windows, Mac, Linux, and Chromebook.
In short, it's the best option out there for formatting books, and it's adding new features all the time, all of which come at no extra cost to current owners.
Video: The Book Formatting Template Tool
For additional instructions and use cases, feel free to check out this video that I did showcasing the book formatting template tool. Check it out!
Want more videos like this? Be sure to subscribe to my YouTube channel for weekly videos!
Formatting Templates – Final Thoughts
Thanks for checking out this Formatting Templates tool. We hope you find this new and free tool helpful when it comes to formatting your book without going completely bonkers.
Happy writing, formatting, and sharing!
Cheers,
