Publishing a hardcover book used to be a complicated task. Amazon didn’t produce them through KDP Print, so you had to go to Lulu or IngramSpark to get them done, which cost extra and resulted in really expensive hardcovers for readers.
But that has changed.
Amazon now allows authors to publish hardcover books on their platform. As of this writing it’s still in beta, and missing a few key details that make it a true competitor to Lulu or IngramSpark (such as dust jackets). But overall it is a solid platform that makes it much easier to publish a hardcover on Amazon.
So how do you publish a hardcover on KDP?
Don’t worry, I’ve got you covered with step-by-step instructions on how to do that in this article, along with some info on Lulu and IngramSpark, and which you should choose.
- Why you should consider publishing a hardcover book
- Which platform you should choose, IngramSpark, Lulu, or KDP Print
- Step by step instructions to create your hardcover book in KDP
Table of contents
- Why Should You Publish Hardcovers on Amazon?
- KDP Hardcovers vs. IngramSpark vs. Lulu
- Step 1: Get Started in KDP Hardcover Creation
- Step 2: Book Details Page
- Step 3: Hardcover Content
- Step 4: Formatting Your Manuscript
- Step 5: Adjusting Your Book Cover
- Step 6: Rights and Pricing Page
- Step 7: Publish!
- Final Thoughts
Why Should You Publish Hardcovers on Amazon?
There are three reasons why you might want to publish your hardcover book on Amazon.
- You have multiple options: Having a hardcover in addition to your ebook and paperback give your readers more options. If they like hardcovers, they might be attracted to you because you offer them. But even if they don’t read hardcovers, readers will be more attracted to your cheaper ebook when they see both a paperback and a hardcover that are much higher in price.
- It looks more professional: Having a hardcover on your Amazon makes it look more like the bestsellers that often have one of each major book format (ebook, paperback, hardcover, audiobook).
- Because they’re awesome: Okay, maybe they’re not for everyone, but a primary reason why you might want one is because it looks good on your shelf. There’s also something nice about the solid feel of a durable hardcover. When you hold a hardcover that you wrote, it feels like an accomplishment, more so than normal that is.
I will say, hardcovers do take additional work to put together, so if you’re short on time, it’s not necessarily a “must-have” for authors. However, it can be a fun little way to diversify your income and turn your book into a more professional-looking machine.
KDP Hardcovers vs. IngramSpark vs. Lulu
All three of these platforms: IngramSpark, Lulu, and KDP offer ways to create hardcovers. But which should you choose?
We’ll come out with a full review and breakdown of each in a future article, but from my own experience I find that IngramSpark produces the better quality hardcovers, and offers better options for expanded distribution of hardcovers.
That said, KDP is by far the best when it comes to simplicity of creating a hardcover.
Lulu used to be a big name in publishing, and they do have one advantage in that they have integration with Shopify for selling books directly. But I find that their end result is too expensive for the reader.
With this in mind, I’d make your decision this way:
- If you’re published wide and therefore value expanded distribution, go with IngramSpark
- If you’re exclusive to Amazon, go with KDP
With that out of the way, let’s talk about how you can actually publish a hardcover book through KDP print.
Step 1: Get Started in KDP Hardcover Creation
KDP only recently (as of this writing) created a beta to publish hardcovers. Amazon has already updated it with new features.
If you are part of the beta, there are two places where you can go to find the hardcover creation area. The first is near the top of the page, under “Create New Title”, as seen here:

You can also reach it by looking under a specific book, where it will have an option for creating a hardcover.
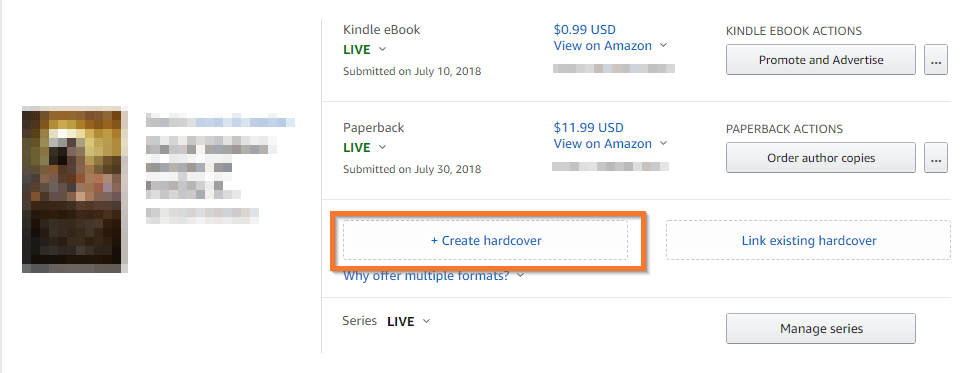
For this article, I actually created a hardcover using these steps, so follow along with me as we set about putting this sucker together.
Step 2: Book Details Page
If you’ve published a paperback book on KDP before, the next page will look very familiar to you.
Note: If you haven’t published an ebook or a paperback on KDP before, I highly recommend you do that first. Hardcovers are slightly more complicated, but build nicely on what you learn in ebook and paperback publication. If you don’t have a book to publish, I’d finish that first.
The book details page has pretty much all the same information that you would find when publishing a paperback. So you’ll want to start by filling out all the relevant fields:
- Language
- Book Title
- Subtitle
- Series Name
- Edition Number
- Author
- Contributors
- Description
- Publishing Rights
- Keywords
- Categories
Once you’re done there, go ahead and hit “Save and Continue”.
Step 3: Hardcover Content
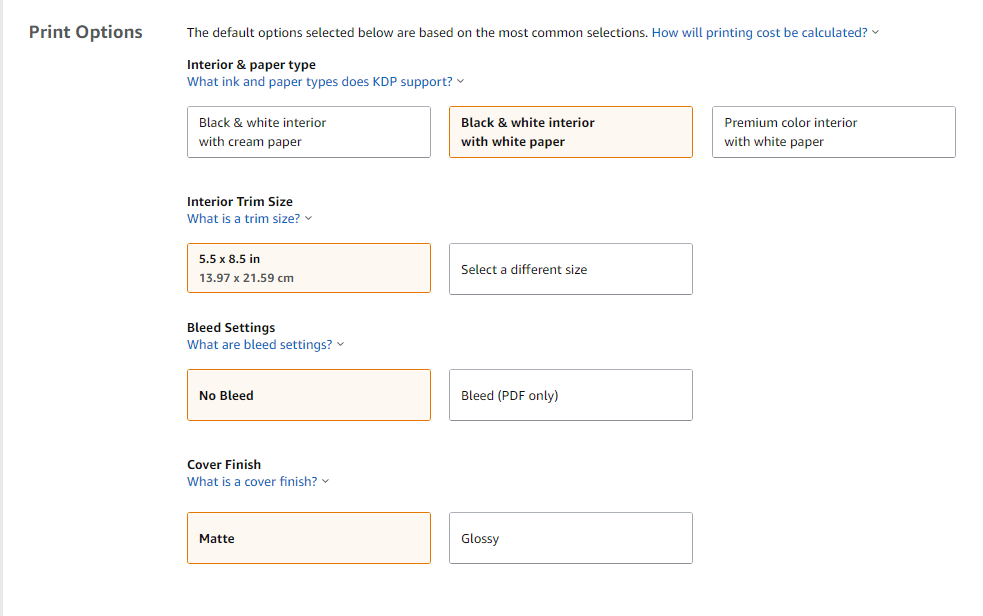
Next you’ll come to the Hardcover Content page, where you upload your manuscript and book cover. Now, if you don’t have those yet, don’t worry, we’ll cover it in steps 4 and 5.
This area also looks very similar to publishing a paperback, with a few exceptions. The most important of which is…
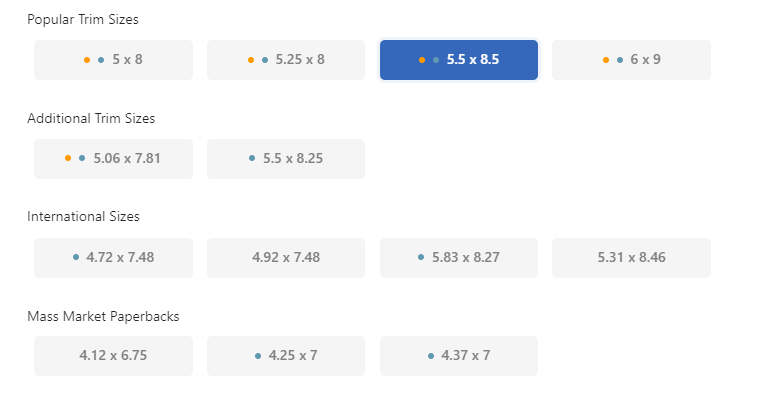
Trim Size

Amazon has a more limited number of trim sizes available for hardcover publishing. They include:
- 5.5×8.5” (13.97×21.59cm)
- 6×9” (15.24×22.86 cm)
- 6.14×9.21” (15.6×23.39 cm)
- 7×10” (17.78×25.4 cm)
- 8.25×11” (20.95×27.94 cm)
So if you published a paperback using any trim size that is not included here, such as 5×8”, then you will have to reformat your manuscript and cover to work with the new size.
Step 4: Formatting Your Manuscript
As mentioned, there’s a good chance that the manuscript you already prepared for a paperback will not work for a hardcover. If that’s the case, you will need to resize it to the desired dimensions.
Thankfully, Atticus makes this easy.
I had published my paperback as a 5×8”, so I had to resize it to a 5.5×8.5”. Since my book was already formatted in Atticus, all I had to do was go to the formatting tab and hit one button, and presto, it was ready to be exported to a PDF in the correct size.
That’s it, literally just one click. It was one of the easiest processes I’ve gone through.
Once that was done, I downloaded the PDF and immediately uploaded it into the “Manuscript” section of the Hardcover Content page. Easy.
Atticus saves a ton of time, not just with changing trim sizes, but with formatting in general. It has all the features that Vellum has, and it’s available for nearly half the cost. In short, it’s one of the most important tools you can have for creating your manuscript.
Step 5: Adjusting Your Book Cover
Next, you will need to adjust your book cover to fit the dimensions that they require. Hardcovers have extra wide margins, so you will need to do this regardless of the current size of your paperback cover.
On the Hardcover Content page, under “Book Cover”, you’ll find a link that says “download a KDP template”. Click this link to find the exact dimensions that you should use.
Once you’ve done that, you’ll get a field with these options to fill out:
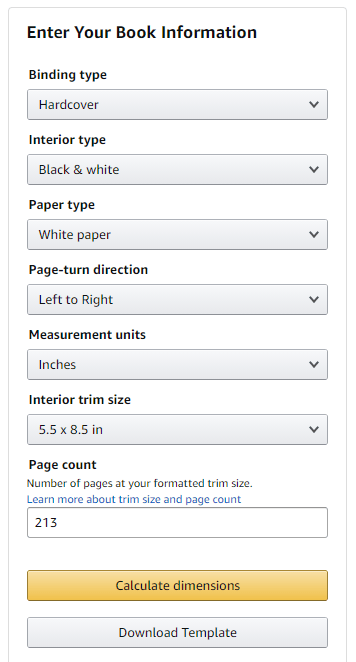
Make sure these fields match the Print Options that you selected in the Hardcover Content page.
For this example, I made the above selections and entered my word count.
Once you’ve done that, click “Download Template” and you should be given a file that looks like this:
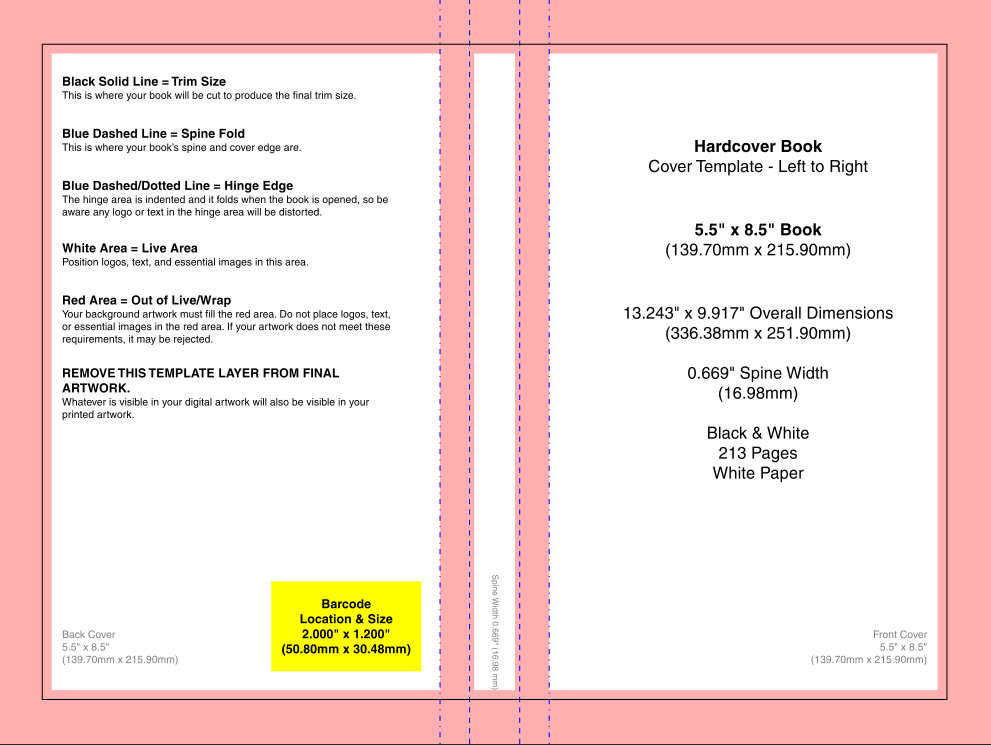
If you’re familiar with the templates for paperback, you’ll notice that the margins are a lot bigger in this template, which means you may have to get creative to make sure that your cover doesn’t lose much of the important parts.
Additionally, you will almost certainly have to adjust the title, author name, and any other text on the cover to fit the new margins.
This can be a complicated step. If you do not have skills with Photoshop or Canva to do it yourself, then I suggest reaching out to the cover designer to do it for you. Give them the template that you downloaded and they can fit it to the right dimensions.
Once you have a PDF of your cover, upload it and then click on “Launch Previewer”.
This will allow you the time to take a final look at the cover and manuscript together to make sure that everything looks good. If it does, move on to the Rights and Pricing page by clicking “Save and Continue”.
Step 6: Rights and Pricing Page
This page should also be very familiar to authors who have published ebooks and paperbacks before. It’s almost identical.
Start by entering in the number of territories you plan to publish in (for most authors this will be all of them), then select your primary marketplace.
Under “Pricing, royalty and distribution” you’ll enter the price of the hardcover book.
As with paperback publishing, it gives you a minimum price to make a profit. Unlike paperback publishing, there is no expanded distribution option, which as far as I can tell is the only part of this page that is different.
Step 7: Publish!
Then all you have to do is click publish! Amazon will look it over to make sure that everything is in order, and if it is, your hardcover should be available to purchase on Amazon within 72 hours (though I find that it’s usually within the first 24 hours).
Next is the “simple” matter of marketing your book, and we have a lot of tools to help you there as well. Just check out our Book Marketing Hub.
Final Thoughts
Publishing a hardcover book is not quite as simple as an ebook or paperback, but it’s certainly a lot simpler than it used to be.
Now that Amazon offers hardcover publishing, the biggest hurdles that you should focus on are reformatting the manuscript and resizing the cover.
The first is easy with Atticus, but the second may require hiring your cover designer to adjust it for you if you’re not comfortable with Photoshop to do so.
Amazon hardcovers still have a ways to go, particularly with the lack of dust jackets and expanded distribution. But since this is still in beta, I have a feeling that more updates are coming soon.
Formatting Has Never Been Easier
Write and format professional books with ease. Never before has creating formatted books been easier.
Click here to see it in action






How is it possible to include the ISBN number on your internal copyright page, if you don’t get it until after you have completed the manuscript containing the copyright page, and it must be uploaded during the publishing process? This is the part i”m confused about. I know that you can download the ISBN after creating the publishing entry for the cover page, but what to do about ISBN for the internal page of the manuscript?
If you are using Bowker to get your identifiers then you should have it prior to creating. If you are getting the number from Lulu or another publishing/print website then you will be assigned one once you start the process and can edit your manuscript once assigned. It can be the last thing you do. You can create the copyright page and then add the ISBN prior to uploading. Hope that makes sense.
This is a great writeup, can you buy in bulk at a reduced price?
You get the book at print cost. Not the price you set for customers. Example: If it costs $5.00 to print my book and I set my price at $10.99…when others purchase they will pay $10.99 but I pay $5.00.
What if I already have my own ISBN and Barcodes for my books?
You will have the option to use your own or use one offered by Lulu.
Hi there.I had a question. I’m looking to self pub my first hardcover. I was wondering if Lulu or IS allows you to design the inside flaps of the dust jacket? If not, are there any self-pub services that do?
I wanted to offer two corrections to the information about Ingram.1) Revisions are only $25 per updated file. It would only be $50 if you update both the cover file and the interior file, and That is only after you accept the initial proof. Revisions are free up to that point.2) Ingram gives you a discount on ISBNs purchased during a title setup. The single ISBN cost is only $87, not $125. The ISBN is still registered to you and owned by you, they’re just offering a discount on the purchase made through Bowker. And, you need to have an account on Bowker to register the ISBN.One additional point: there are no setup or revision fees at all for using Ingram if you’re an IBPA member ($129 per year). The membership has pretty much paid for itself just with the saving on title setup and revisions through Ingram, so just throwing that out there.